What is the issue?
Splices are convenient but can be daunting to master.Why address this?
A splice is a convenient and highly secure way to finish a line. They are also a very efficient method of making off rather than a knot or a hitch. Bowlines weaken lines by about 45%, hitches by about 35% but a well-made eye splice can reduce the lines breaking strength by less than 5%. Having the ability to easily produce splices will be a useful addition to ones boating capability.How to address this?
Splices need not be overly complex when it comes to hollow braid ropes made entirely of polyester, nylon, polyolefins, or some combination of these materials. The very simple ‘double pass-through and bury’ technique, often referred to as the Locked Brummel Eye Splice, provides a perfectly serviceable splice in this type of line.A hollow fid is ideal for splicing but this approach is so simple that a Philips screwdriver to spread the braid is ample assistance. All that is required of the line is that both ends are available and that the overall length of the rope is not excessive.

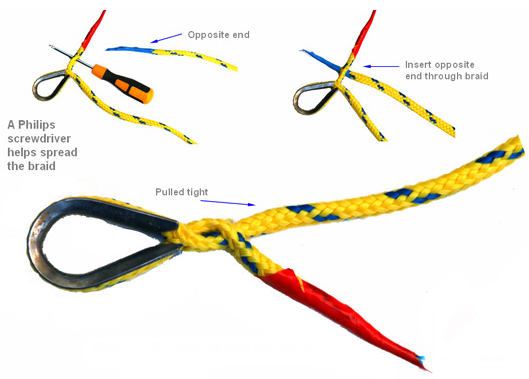
Form a point on either end of the line with self-adhesive tape. The use of both red and blue pass-through tape shown above is only to assist the pictorial representation. Make a central hole in the braid with a fid or, if this is not available, a Philips screwdriver. As in this example an 8mm sixteen plait polypropylene braid, there should be eight strands in the body of the rope on either side of the hole at the point where it enters and then leaves the rope. Make sure the section of rope forming the eye is not twisted in any way. Then push the (red) tapered point of the bitter end through and pull to the desired size tightness.

Use the screwdriver to create a second opening directly through the bitter end section as above. Then insert the opposite (blue) end of the rope through the opening and pull the entire length of rope through until the resulting loop (brummel) below the base of the eye is tight.

Pick a point on the braid in which one strand crosses over or under a strand and push the screwdriver in between and into the core. Loosen up the entry point and open it out. Insert the (red) tapered bitter end back into the body of the line close below the bottom of the last brummel. Whip off the opposite end and over the brummel if you care to have a neater finish.
The above diagram is simplified for representation and the buried section is a little short. The buried section should be 40 to 80 x the diameter of the line. In this case, with 8mm braid, it would need to be between 3.2cm-6.4cm. The thimble is not necessary for the approach but does prevent chafe in regular boating use. If a particular line does not have a lose enough core to allow the end burial, an alternative approach is to finish it by whipping it down.
With thanks to:
Michael Harpur, Yacht ObsessionAdd your review or comment:
Please log in to leave a review of this tip.
eOceanic makes no guarantee of the validity of this information, you must read our legal page. However, we ask you to help us increase accuracy. If you spot an inaccuracy or an omission on this page please contact us and we will be delighted to rectify it. Don't forget to help us by sharing your own experience.

